Categories
Disney Food Disney Parks Disney Recipes Other

Disney Recipe: Make PB & J Rolls from Disney California Adventure’s Lamplight Lounge

Lamplight Lounge at Disney California Adventure’s Pixar Pier brings the flavors of childhood together with the class and elegance of adulthood (yes, you’re classy).

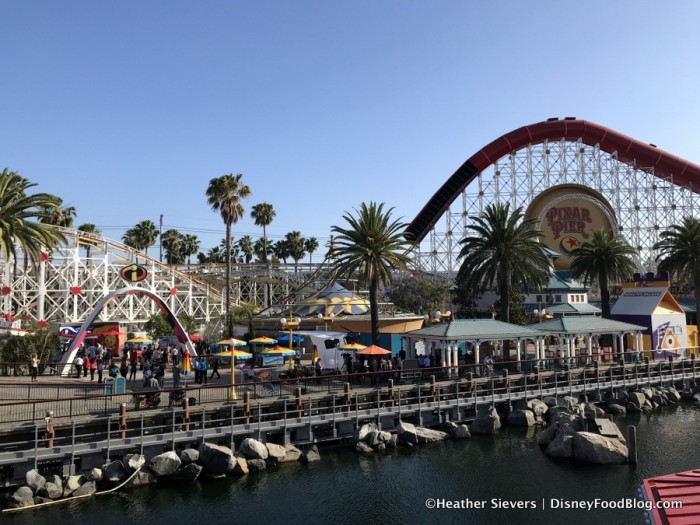
Views of Pixar Pier from Lamplight Lounge

Views of Pixar Pier from Lamplight Lounge

And now you can make one of these recipes in your own kitchen!

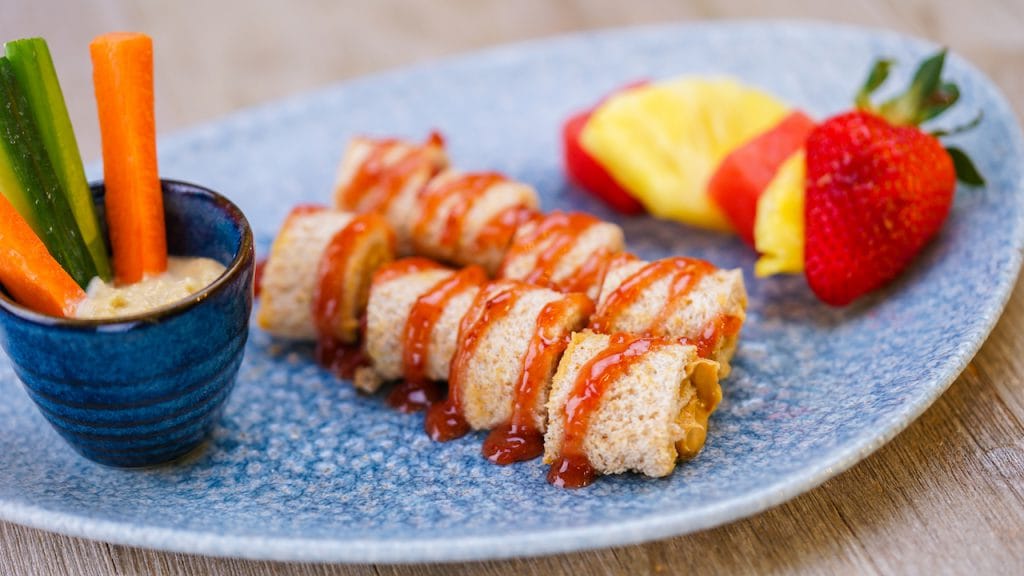
Lamplight Lounge’s Peanut Butter and Jelly Rolls use some of your pantry staples to create a snack that children and adults can both love! So put on your favorite Disney playlist and lets get cooking!

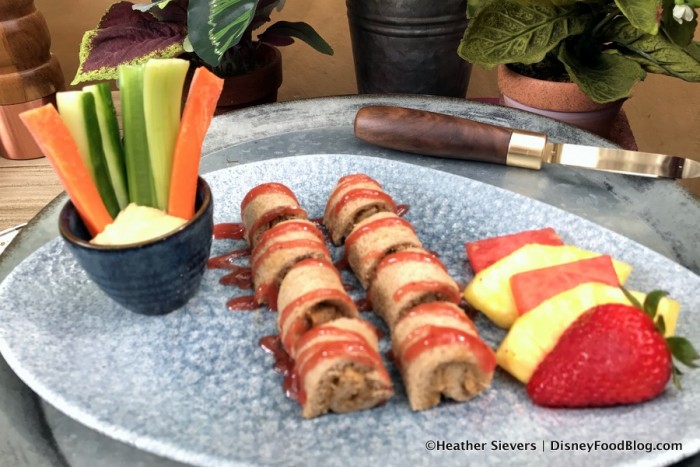
PB&J Roll Plate

PB&J Roll Plate

Ingredients

  • 8 slices wheat bread
  • 3/4 cup creamy peanut butter, divided
  • 3/4 cup strawberry or grape jelly

Preparation

For Peanut Butter Rolls

  1. Cut crusts off bread. Flatten bread with rolling pin until bread can bind after being rolled.
  2. Spread 1 1/2 tablespoons of peanut butter evenly on each slice of flattened bread, leaving small boarder on all sides – the peanut butter will spread as you roll.
  3. Starting with long side of bread, gently roll up each bread slice into spiral. Cut each roll into 4 even pieces.
  4. Place 8 pieces of rollups onto each plate, seam-side down.

For Jelly Drizzle

  1. Place plastic quart-size freezer bag into small cup, folding back first few inches of bag over top of cup. Spoon jelly into bag, gently shaking bag to move jelly to bottom of bag. (Note: If jelly is too thick to drizzle, add small amount of warm water to jelly in small bowl and mix to desired consistency before adding to bag).
  2. Once filled, lift bag from cup and squeeze out excess air from bag and seal bag with a few twists to top of bag. Cut bottom corner of bag with scissors.
  3. Holding right below the twisted top of bag with one hand and guiding with free hand, gently squeeze to drizzle jelly over each peanut butter roll with zigzag motion.

For a visual step-by-step, check out Disney’s video below!

Need even more Disney recipes? Check them out here!

Heather Sievers is DisneyFoodBlog’s Dining in Disneyland columnist! Check out more of her adventures at @DininginDisney on Instagram!

When you make a PB&J, do you put peanut butter on both pieces or bread or just one? Let us know in the comments!

Related posts:

  1. NEW! Orange Vanilla Coke and Honey-Mustard Chicken Wings Found in Disney California Adventure!
  2. The Birthday Mickey Cake Pop in Disneyland Is Basically The Cutest Thing Ever.
  3. Popcorn News! The New Mickey Light-Up Tree Popcorn Bucket Has Arrived at Disneyland Resort!

From our friends at www.disneyfoodblog.com
Filed Under: disney california adventure, Disneyland Column, Disneyland Resort, Featured, Recipe, Snacks, Disney California Adventure, Disney recipe, disney recipes, Disney snack, Disneyland, disneyland dining, Lamplight Lounge, PB&J rolls
Categories
Disney Food Disney Movies Disney Recipes Other

Disney Recipe: Make These “Up” Inspired S’mores for Movie Night

From Mickey beignets to Totchos, there’s no shortage of fun new Disney recipes to whip up in your kitchen. And now, Disney has released the recipe for a fun twist on s’mores that’s almost (keyword: almost) too cute to eat!

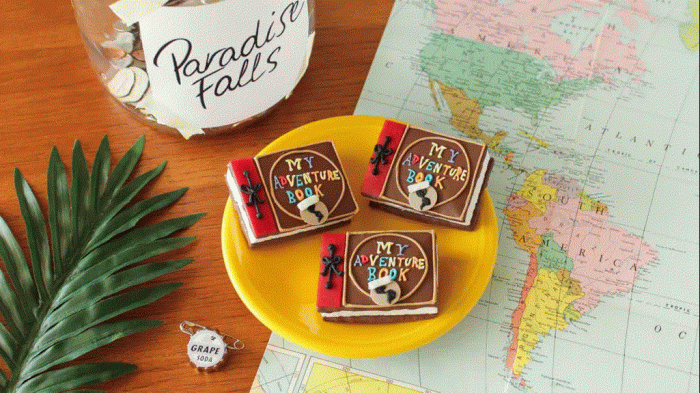
While you may be spending more time at home these days, adventure is out there even in your kitchen with these Up-inspired s’mores from Disney Family.

These sweet treats mimic the look of the iconic My Adventure Book from Up, and they’re pretty much the ideal thing to make before having a fun Disney+ movie night at home.

Ingredients:

  • 12 large, rectangular graham crackers
  • 1-2 tsp vegetable oil (optional)
  • Your favorite homemade marshmallow recipe
  • 6 peanut butter candy melts
  • 1 Tbsp each of purple, red, blue, and white icing
  • 12 oz. of chocolate bar or chocolate candy coating, melted
  • Red fruit leather or fruit tape
  • ¼ cup powdered sugar
  • 2 Tbsp each of tan, yellow, orange, and black icing
  • 7 piping bags fitted with #1 or #2 tips (for each of the colored icings), 1 piping bag fitted with #44 tip (for the white icing), toothpicks

Directions:

  • Make the covers. Using a serrated knife, cut 2 inches off the length of each graham cracker. The remaining cracker should be 2 x 3 inches. Dip each cracker in melted chocolate, thinning the chocolate with oil if needed. Allow to set.
  • Create the binding. To create the book binding, cut out a 2 x ½-inch strip of red fruit leather. Use a dab of melted chocolate to attach this on the left side of each “book cover” cracker.
  • Make the marshmallows. Make the marshmallows according to your favorite recipe. Pour the marshmallow mixture into a 9 x 13-inch pan heavily dusted with powdered sugar. Fill the pan evenly to a depth of ½ inch. Allow to set. Use a long, thin knife brushed with oil to cut out 6 rectangles of marshmallow, each measuring 2 x 3 inches.
  • Decorate with details. Use the tan colored icing to draw square and circular borders on each “book cover.” Flat side facing up, attach a peanut butter candy melt chip under the text area. Use black icing and a toothpick to lightly draw the shape of North and South America. Write “My Adventure Book” with colored icing fitted into piping bags. Pipe a black icing ribbon tie atop the red fruit leather “binding.” To finish, pipe a thick line of white icing “tape” on the top left side of the globe.
  • Enjoy your s’mores! Place a cut marshmallow in between one “book cover” graham cracker and one plain, chocolate-dipped graham cracker. You can toast the marshmallows or just enjoy them plain.

After you make these decorative s’mores, make sure you take a few photos for your personal Adventure Book! And if you’re feeling inspired, then you can try your hand at more s’mores-inspired recipes like these Mickey S’mores Cupcakes and the S’mores Bake from the now-defunct Big Thunder Ranch Barbecue in Disneyland.

Just make sure no matter what s’mores recipe you make, that you remember to have fun!

Will you be making these Up-themed s’mores?! Let us know in the comments!

Related posts:

  1. Celebrate Easter at Home with These DIY Disney Activities!
  2. Here’s How To Get A FREE Disney Cupcake for National S’mores Day!
  3. Recipe: Make a Disney Park Drink at Home with This Recipe for Joffrey’s Chai Tea Latte!

From our friends at www.disneyfoodblog.com
Filed Under: Disney News, Disney+, Featured, News, Recipe, Snacks, dessert recipe, Disney, disney desserts, Disney recipe, disney treats, kid-approved, s’mores, UP

Categories
Disney Food Disney Parks Disney Recipes Other

#DisneyMagicMoments: Cooking Up the Magic — PB and J Rolls Put a Fun Spin on a Lunchtime Classic

There is something comforting about slathering creamy peanut butter on fresh soft bread then layering on strawberry or grape jelly. This lunchtime staple is a happy reminder that three simple ingredients can make the perfect meal for kids … and one bite will bring back a flood of childhood memories for us adults!

Leave it up to the chefs at Lamplight Lounge at Disney California Adventure park to take this classic lunchtime sammie up a notch in presentation. All the ingredients are there – with a clever spin! This is the perfect sandwich to make with the kiddos – even the youngest can help! Check out the recipe below as well as the how-to video from the Disney Youth Education Series team.

PB and J Rolls from Lamplight Lounge at Disney California Adventure Park

PB and J Rolls from Lamplight Lounge at Disney California Adventure Park

PEANUT BUTTER ROLLS

  • 8 slices wheat bread
  • 3/4 cup creamy peanut butter, divided

JELLY DRIZZLE

  • 3/4 cup strawberry or grape jelly

For peanut butter rolls:

  1. Cut crusts off bread. Flatten bread with rolling pin until bread can bind after being rolled.
  2. Spread 1 1/2 tablespoons of peanut butter evenly on each slice of flattened bread, leaving small boarder on all sides – the peanut butter will spread as you roll.
  3. Starting with long side of bread, gently roll up each bread slice into spiral. Cut each roll into 4 even pieces.
  4. Place 8 pieces of rollups onto each plate, seam-side down.

For jelly drizzle:

  1. Place plastic quart-size freezer bag into small cup, folding back first few inches of bag over top of cup. Spoon jelly into bag, gently shaking bag to move jelly to bottom of bag. (Note: If jelly is too thick to drizzle, add small amount of warm water to jelly in small bowl and mix to desired consistency before adding to bag).
  2. Once filled, lift bag from cup and squeeze out excess air from bag and seal bag with a few twists to top of bag. Cut bottom corner of bag with scissors.
  3. Holding right below the twisted top of bag with one hand and guiding with free hand, gently squeeze to drizzle jelly over each peanut butter roll with zigzag motion.

Cook’s Note: A squeezable bottle of jelly is an easy option. Simply squeeze, in zigzag motion, desired amount of jelly over each peanut butter roll.

Note: This recipe has been converted from a larger quantity in the restaurant kitchens. The flavor profile may vary from the restaurant’s version. As a reminder while preparing this recipe, please supervise children who are helping or nearby.

Click here for a print-at-home version of this recipe!

Stay connected with  Disney Parks Blog for more delicious Disney recipes and be sure to share the magic with other Disney fans using the hashtag #DisneyMagicMoments. Happy cooking!

From our friends at disneyparks.disney.go.com
Filed Under: Disney California Adventure Park, Disney Dining, Disneyland Resort, DCA, Dining, DLR, Recipe, Video

Categories
Disney Food Disney Parks Disney Recipes

Disney’s Kitchen Sink Recipe!

Kitchen Sink

We hope you brought your sweet tooth because we have the kitchen sink recipe!

If you have ever been at the Beaches & Cream Soda Shop in Disney’s Beach Club Resort then you are familiar with the Kitchen Sink!. This giant ice cream sundae will put a good challenge to you and your family.

Do you accept the challenge? Then let the siren lights go on!

INGREDIENTS:

  • 1/2 cup of warm fudge topping
  • 1/2 cup of warm butterscotch topping
  • 1/2 cup of warm peanut butter topping
  • 1 medium banana sliced in 1/2 inch slices
  • 1 cinnamon spice cupcake quartered
  • 1 angel food cupcake quartered
  • 2 generous scoops of vanilla ice cream
  • 2 generous scoops of chocolate ice cream
  • 2 generous scoops of strawberry ice cream
  • 1 generous scoop of mint chocolate chip ice cream
  • 1 generous scoop of coffee ice cream
  • 3 tbsp of chocolate syrup
  • 1/4 cup of marshmallow cream
  • 1/4 cup of strawberry topping
  • 1/4 cup of pineapple topping
  • 14 oz can of dairy whipped topping
  • 1 large brownie quartered
  • 1 regular sized candy bar quartered
  • 4 chocolate cookies with cream filling
  • 1 tbsp of sliced toasted almonds
  • 1 tbsp of dark and white chocolate shavings
  • 1 tbsp of crushed chocolate cookies with cream filling
  • 1 tbsp of chopped jellied orange slices (about 2 slices)
  • 1 tbsp of milk chocolate chip morsels
  • 1 tbsp of peanut butter chip morsels
  • 1 tbsp of chocolate sprinkles
  • 1 tbsp of rainbow sprinkles
  • 1/2 cup of drained maraschino cherries

INSTRUCTIONS TO SERVE THE KITCHEN SINK:

  • Pour the hot fudge, butterscotch and peanut butter topping into the bottom of a large bowl
  • Layer banana slices and cupcake pieces and cover with all ice creams flavors
  • Spoon chocolate syrup, marshmallow cream, strawberry and pineapple toppings over the ice cream
  • Cover with dairy whipped topping, then put some brownie pieces, candy bar and cookies in whipped topping
  • Sprinkle with toasted almonds, dark and white chocolate shavings, crushed cookies, jellied orange slices, milk chocolate chip and peanut butter morsels, chocolate and rainbow sprinkles then top with cherries.

This kitchen sink recipe serves 4 to 6 people so there’s plenty to share with your family!

Credit: Disney Parks Blog

From our friends at chipandco.com
Filed Under: Disney Food, Disney Snacks & Treats, Resorts, Walt Disney World, beaches & cream shop, disney magic moments, Disney Recipe, disney snack, Disney’s Beach Club Resort, kitchen sink, WDW

Categories
Disney Food Disney Parks Disney Recipes Other

Disney Recipe: Clear the Freezer — We’re Making The Kitchen Sink Sundae From Beaches & Cream Soda Shop

Have you ever built your own sundae and there were just too many choices??

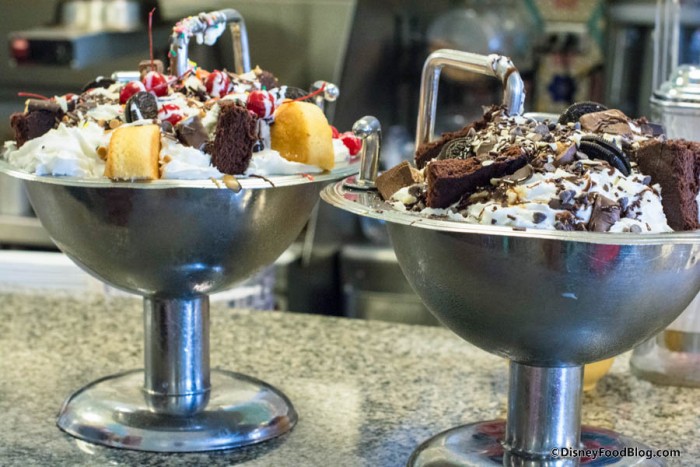
The Kitchen Sink Sundaes at Disney’s Beach Club Resort

The ice cream was already starting to melt as you piled on even more sprinkles and cookie crumbs? Well we have some great news for you — you can have ALL the toppings with this sundae recipe inspired by the Kitchen Sink from Disney’s Yacht and Beach Club Resorts.

If you’ve ever been to Beaches and Cream Soda Shop, you may have caught a glimpse of this concoction. We’d like to say this sundae has “everything but the kitchen sink,” but, well — it has one of those too!

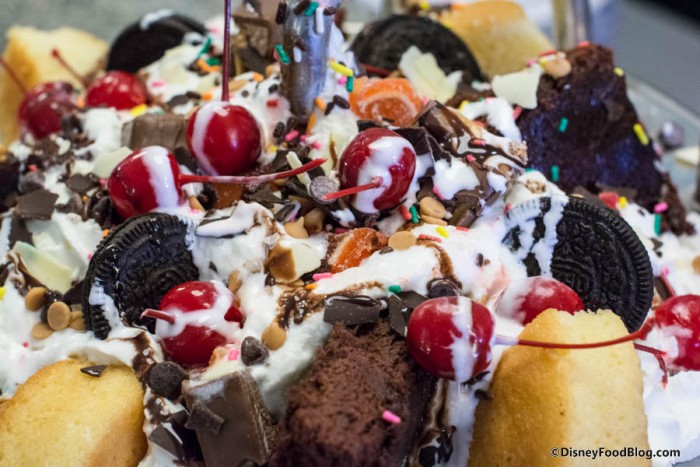
Close up on the Original Kitchen Sink

But get your shopping list ready and clear out the freezer because Disney’s recipe doesn’t skimp on the ingredients! You are, of course, free to substitute as you please and make your own creation, but this is Disney’s version with a patriotic twist!

Ingredients

  • 1/2 cup warm fudge topping
  • 1/2 cup warm butterscotch topping
  • 1/2 cup warm peanut butter topping
  • 1 medium banana, sliced in 1/2-inch slices
  • 1 cinnamon spice cupcake (2 ½ x 1 1/4-inch), quartered
  • 1 angel food cupcake (3 x 1 1/2-inch), quartered
  • 2 generous scoops vanilla ice cream
  • 2 generous scoops chocolate ice cream
  • 2 generous scoops strawberry ice cream
  • 1 generous scoop mint chocolate chip ice cream
  • 1 generous scoop coffee ice cream
  • 3 tablespoons chocolate syrup
  • 1/4 cup marshmallow cream
  • 1/4 cup strawberry topping
  • 1/4 cup pineapple topping
  • 14-ounce can dairy whipped topping
  • 1 large brownie (6-inch x 6-inch), quartered
  • 1 regular-sized candy bar, quartered
  • 4 chocolate cookies with cream filling
  • 1 tablespoon sliced toasted almonds
  • 1 tablespoon dark and white chocolate shavings
  • 1 tablespoon crushed chocolate cookies with cream filling
  • 1 tablespoon chopped jellied orange slices, about 2 large slices
  • 1 tablespoon milk chocolate chip morsels
  • 1 tablespoon peanut butter chip morsels
  • 1 tablespoon chocolate sprinkles
  • 1 tablespoon rainbow sprinkles
  • 1/2 cup drained maraschino cherries

To Serve

  1. Pour hot fudge, butterscotch, and peanut butter toppings into bottom of large bowl.
  2. Layer banana slices and cupcake pieces over toppings. Top with all ice creams.
  3. As quickly as possible, spoon chocolate syrup, marshmallow cream, strawberry, and pineapple toppings over ice cream.
  4. Cover completely with dairy whipped topping. Tuck brownie pieces, candy bar pieces, and cookies in whipped topping.
  5. Sprinkle with toasted almonds, dark and white chocolate shavings, crushed cookies, jellied orange slices, milk chocolate chip morsels, peanut butter morsels, chocolate sprinkles, and rainbow sprinkles. Top with cherries.

And DIVE IN because this thing will melt quickly on you. You can watch Disney’s video on how to assemble your own Kitchen Sink sundae below!

You can make it your own, serve it in individual bowls — whatever you please! Let us know if you tried it and how YOU would make the perfect Kitchen Sink sundae!

What would you add to your Kitchen Sink? Let us know in the comments!

From our friends at www.disneyfoodblog.com
Filed Under: Beach Club Resort, disney resorts, Featured, Recipe, Snacks, Special Stuff, Walt Disney World, Yacht Club Resort, beaches & cream soda shop, Beaches and Cream Soda Shop, Disney, disney dessert, disney dining, Disney recipe, disney snacks, disney’s yachet and beach club resorts, Ice Cream, Kitchen Sink, kitchen sink sundae