Categories
Disney News

Inspired Schoolgirl Asks for Disney Princesses with Glasses

Inspired Schoolgirl Asks for Disney Princesses with Glasses Disney princesses

Inspired Schoolgirl Asks for Disney Princesses with Glasses

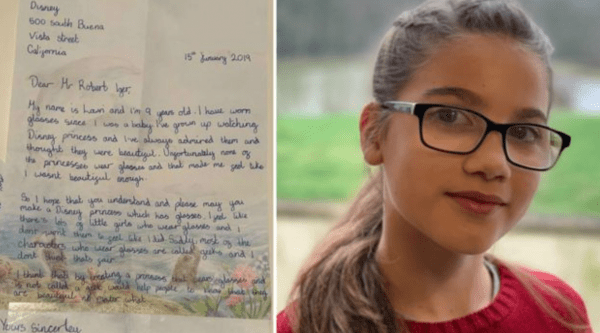
Eleven-year-old Lowri Moore, from Nottingham, England, wrote a letter to Bob Iger last year requesting the creation of Disney princesses that wear glasses. According to BBC News, Lowri, who wears glasses, said that she wanted to see more characters “wearing glasses like me.”

Lowri’s letter to Bob Iger read: “I’ve grown up watching Disney princesses and I’ve always admired them and thought they were beautiful. Unfortunately, none of the princesses wear glasses and that made me feel as though I’m not beautiful enough.”

Lowri described that the Disney characters featured with glasses were typically portrayed as “geeky or nerdy instead of beautiful.” She felt so strongly about the need for a glasses-wearing Disney princess that she came up with her own!

Inspired Schoolgirl Asks for Disney Princesses with Glasses Disney princesses

Photo credit: Cyrilyn Moore.

A local illustrator, Natalie Owen, heard about Lowri’s letter and character idea, and was a Disney fan herself- so she decided to help out! According to BBC News, Owen decided to create the story, ‘Princess Rose and the Golden Glasses,’ featuring a beautiful princess in an orange gown and, you guessed it…glasses!

Lowri was thrilled about the glasses-wearing princess- “The illustrations are amazing and I’m so excited this has happened. Rose has blue-ish glasses, brown long hair, kind of like me. Even if it’s not Disney it’s still a role model for young people. I’m happy I got to create one.”

Lowri’s mother was also touched by the new book- “[The character] thinks she’s not beautiful because she’s wearing glasses. A bit like someone else I know. And she goes on a bit of an adventure where she discovers she actually is beautiful. To come from a nine-year-old’s mind it’s so clever. I’m super proud.”

Although there is no response from Disney to Lowri’s letter, it would be great to see a glasses-wearing Disney princess in the future!

Check back here on Chip & Co. for the latest theme park & entertainment news updates!

Source: BBC News.

From our friends at chipandco.com
Filed Under: Animation Studios, Books, Characters, Disney & Co, Disney+, Movies, News, Other Disney Stuff, Walt Disney Pictures, Bob Iger, disney movies, Disney Pictures, Disney Princesses, Glasses, Schoolgirl

Categories
Disney Food Disney Parks Disney Recipes

Delicious Up Inspired S’mores Recipe!

Delicious Up Inspired S’mores Recipe!

Adventure is out there! And what better way to enjoy it then with some delicious Up inspired s’mores!

Because when you are traveling through South America you are gonna need some treats to keep your energy up. So why not something fluffy and sweet? We think s’more is a fantastic idea specially if they are in the form of “My Adventure Book” from UP! 

INGREDIENTS:

  • 12 large rectangular Graham crackers
  • 12 oz of chocolate bar or chocolate candy coating melted
  • 6 peanut butter candy melts
  • 1/4 cup of powdered sugar
  • 1-2 tsp of vegetable oil (optional)
  • Your favorite homemade marshmallow recipe
  • Red fruit leather or fruit tape
  • 2 tbsp each of tan, yellow or orange and black icing
  • 1 tbsp each of purple, red, blue and white icing
  • 7 piping bags fitted with #1 or #2 tips for each of the colored icings
  • 1 piping bag fitted with #44 tip for the white icing
  • Toothpicks

INSTRUCTIONS TO CREATE UP INSPIRED S’MORES:

Step 1: Make the covers of the Adventure Book using a serrated knife and cut 2 inches off the length of each graham cracker. The remaining cracker should be 2×3 inches

Step 2: Dip each cracker in melted chocolate. You can thin the chocolate with oil if you need

Delicious Up Inspired S’mores Recipe!

Step 3: To create the book binding, cut out a 2×1/2 inch strip of the red fruit leather or fruit tape. Use a bit of melted chocolate to attach it on the left side of the book cover

Delicious Up Inspired S’mores Recipe!

Step 4: Pour the marshmallow mix into a 9×13 inch pan heavily dusted with powdered sugar. Fill the pan evenly to a depth of 1/2 inch and allow to set

Step 5: Using a thin knife brushed with oil cut out 6 rectangles of marshmallow of 2×3 inches each

Delicious Up Inspired S’mores Recipe!

Step 6: Use the tan colored icing to draw a square and circular borders on each “Adventure Book”

Step 7: Attach a peanut butter candy melt chip under the text area. Then use black icing and a toothpick to draw the shape of North and South America on it

Step 8: Write “My Adventure Book” with colored icing fitted into pipping bags. Then pipe a black icing ribbon tie on the red fruit leather binding. To finish, pipe a thick line of white icing on the top left side of the globe to simulate a piece of tape

Delicious Up Inspired S’mores Recipe!

Step 9: Place a cut marshmallow in between one book cover and one plain graham cracker to complete your UP inspired s’mores!

Delicious Up Inspired S’mores Recipe!

And done! Now it’s time to enjoy your Up inspired s’mores while exploring the wilderness or watching Up on Disney+! 

Credit: Disney Family

From our friends at chipandco.com
Filed Under: Other Disney Stuff, Disney Snacks & Treats, Pixar, Disney Family, Disney Recipe, My adventure book, Pixar Up, Smores recipe, Up, UP smores

Categories
Disney News

Orange County requires everyone to wear a mask in public

Orange County requires everyone to wear a mask in public Orange County

Earlier today, Orange County Mayor Jerry Demings issued a statement in regards to new health and safety precautions. The central Florida area has seen a resurgence of the COVID-19 virus in the past 10 days. Starting this weekend, every person in Orange County must wear a face mask in public.

“We do not want to experience another shutdown in our community,” Demings said. In the future, the county could also see more restrictions go into effect to help protect people during this pandemic.

The order will take effect starting at 12:00 AM EST  this Saturday. The face mask requirement will remain in place indefinitely. It’s important to note that people are permitted to take off the mask while eating or drinking, but they must wear the mask as they enter such establishments. Employees of businesses must wear a face covering at all times. People who are exercising outside are exempt from the order.

“We’re buying time with this measure,” Demings said until a vaccine or cure for the virus is found.

It’s been established for a while now that guests going to Walt Disney World Resort would be required to wear a face mask. Now it’s important to keep in mind that all public places in Orange County will also require face masks going forward for the indefinite future.

Source: Orlando Sentinel

From our friends at chipandco.com
Filed Under: Disney & Co, News, Other Disney Stuff, Disney World, Face Masks, Orange County, orlando news, Walt Disney World

Categories
Other

DIY Beaker Bottle Planter

DIY Beaker Bottle Planter beaker bottle planter

Meep! It’s a Beaker Bottle Planter!

Looking for new ways to help the environment? Well what about getting some inspiration from The Muppets and craft some bottle planters!

Making one is super easy and fun. This time we will make one inspired in Beaker! Cute right? And the best thing is you can recycle things you already have at home! Take a look:

SUPPLIES:

DIY Beaker Bottle Planter

  • 2 liter bottle
  • Scissors
  • Peach colored paint
  • Large paint brush
  • Green sock
  • Template
  • Cardstock or paper
  • Colored craft foam
  • Hot glue
  • Soil
  • Seeds

HOW TO MAKE YOUR BEAKER BOTTLE PLANTER:

  • Step 1: Cut off the top third of the bottle

DIY Beaker Bottle Planter

  • Step 2: Paint the bottle using the peach colored paint

DIY Beaker Bottle Planter

  • Step 3: Place the green sock onto the bottom of the bottle and cut off the excess

DIY Beaker Bottle Planter

  • Step 4: Print the template. You can find it here! Then cut out the pieces.

DIY Beaker Bottle Planter

  • Step 5: Using the colored foam, cut out the shapes and then glue them to the bottle to create Beaker’s face!

DIY Beaker Bottle Planter

  • Step 6: Once everything is glued, fill the planter half way with soil, plant seeds and water

DIY Beaker Bottle Planter

Once you are done you can donate your little Beaker Bottle Planter to a community center or garden! If you like to learn about how to help your community, you can do it at Disney.com/BeInspired 

DIY Beaker Bottle Planter

Have fun crafting and creating a brighter tomorrow!

Credit: Disney Family

From our friends at chipandco.com
Filed Under: Muppets, Other Disney Stuff, Beaker, beaker bottle planter, disney craft, Disney DIY, Disney Family, Disney Inspired, The Muppets

Categories
Disney Food Disney Parks Disney Recipes

Make this at home – Sorcerer’s Hat Cake Pops Recipes

Make this at home – Sorcerer’s Hat Cake Pops Recipes Cake Pops

Today, we are introducing another Disney-inspired dessert based on Disney’s Fantasia. The Sorcerer’s Hat Cake Pops are a hit at parties and upcoming celebrations. If you want to learn how to create your own, then continue reading below!

Ingredients

  • 1 box cake mix (bake as directed on box for 13 x 9 cake)
  • 1 can (16 oz) of ready made frosting
  • Wax paper
  • Baking sheets
  • White candy coating
  • Blue candy coating
  • Chocolate covered mints (such as Junior Mints)
  • Yellow jumbo star sprinkles
  • Yellow candies (such as Starburst)
  • No. 807 Decorating tip
  • No. 12 Decorating tip
  • Toothpicks
  • Small paintbrush
  • Paper lollipop sticks
  • Styrofoam block

One cake mix makes roughly 48 cake pops. You’ll need at least one ounce of candy coating for each cake pop you plan on dipping and more for any extra decorating.

Directions

After cake is cooked and cooled completely, crumble into a large bowl.

With a large spoon, mix cake thoroughly with about 3/4 of the can of frosting. You won’t need the rest.

Roll mixture into quarter size cake balls and place on a baking sheet covered with wax paper.

Once you have rolled the cake balls, you can then re-shape them into cones. Get the shape started by hand molding and then lay the cone shape on the wax paper and roll back and forth gently to help smooth out the shape. You can also rub the bottom side on the wax paper gently to help flatten the bottom.

Place the cone-shaped cake balls in the freezer for about 15 minutes to firm up. You can transfer them to the refrigerator to keep chilled and avoid freezing.

While the cake is chilling, you can make moons for the hat. Work with one Starburst candy at a time. Place it in the microwave for just a few seconds to make it more pliable. Then using a small glass or rolling pin, roll the candy flat. To make the moon you can use two small circular edges to cut the shapes. Decorating tips are the perfect size.

Cut out circles with the smaller end of a No. 807 decorating tip, then use the small end of a No. 12 decorating tip to remove another circular shape from inside the larger circle to create moons. Repeat with more yellow candies as needed.
Note: You can also place them on the side of the large tip so they remain slightly curved and therefore easier to attach to the cake pop shape.

Make this at home – Sorcerer’s Hat Cake Pops Recipes

Melt white candy coating in a heat-proof plastic bowl so that the coating is at four inches deep for easier dipping. Melt in the microwave in 30 second intervals on low, stirring in between. Repeat until melted and smooth. Add blue candy color and stir until completely combined and you achieve the desired shade of blue.

Make this at home – Sorcerer’s Hat Cake Pops Recipes

Remove a couple of cake balls at a time from the refrigerator to work with.

Dip the tip of a lollipop stick into the melted coating and insert into the bottom of the cone shape. Dip the cake pop into the coating and remove in one motion without stirring. Make sure the entire cone-shaped cake ball is covered. Using a deep bowl is helpful here. If your coating is too thick, you can add a few drops of vegetable oil or shortening to help thin it and make it easier to work with.

Remove and allow any excess coating to fall off the pop and back into the bowl.

Attach a Junior Mint to each side of the hat for Mickey’s ears.

Make this at home – Sorcerer’s Hat Cake Pops Recipes

Then, while coating is still wet, attach two star sprinkles and one moon. Place in a styrofoam block to dry. You can also attach the stars and moon after the coating sets by using a toothpick to dot a small amount of coating to use as glue.

Make this at home – Sorcerer’s Hat Cake Pops Recipes

You can wrap your Sorcerer’s Hat cake pops in treat bags tied with a ribbon and/or store them on the counter or in an airtight container.

Let us know if  you make your own cake pops using this recipe!

Source: Disney Family 

From our friends at chipandco.com
Filed Under: Disney Food, Disney Snacks & Treats, News, Other Disney Stuff, disney dessert, Disney Recipe, Fantasia, mickey mouse, Sorcerer’s Apprentice